Mastering 3D Lighting: Top Techniques for Stunning Photos
In the realm of 3D photography, lighting plays an indispensable role in shaping the final outcome of an image. It has the power to create mood, evoke emotions, and bring depth to a scene. Mastering 3D lighting techniques can elevate your photographic skills and result in stunning, lifelike images that capture the viewer’s attention. This article delves into the top techniques for mastering 3D lighting in photography, offering insights and practical tips to enhance your creative process.
Understanding the Fundamentals of 3D Lighting
Before diving into advanced techniques, it’s crucial to comprehend the basic principles of lighting in a 3D context. In 3D photography, lighting is not just about illuminating the subject; it’s about creating a sense of depth and dimension. This involves considering the interplay of light and shadow, the direction and quality of the light source, and how these elements contribute to the overall composition.
The Role of Light and Shadow
Light and shadow are the cornerstones of 3D photography. Shadows add depth and texture, helping to define the form of the subject. By manipulating shadows, photographers can emphasize certain features or create dramatic contrasts that enhance the three-dimensionality of the image.
Direction and Quality of Light
The direction of light affects how the subject is illuminated, influencing the mood and perception of the image. Front lighting, side lighting, and backlighting each have unique effects on the subject. Moreover, the quality of light—whether soft or hard—can drastically change the feel of a photo. Soft light, with its gentle transitions and reduced shadows, is often used for portraits, while hard light, with its sharp edges and high contrast, is ideal for creating dramatic effects.
Top 3D Lighting Techniques
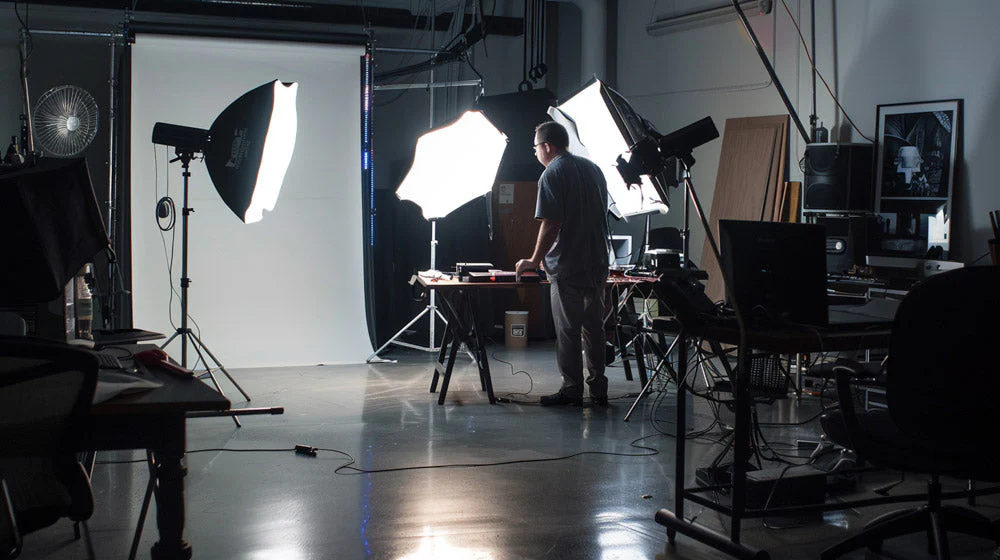
1. Three-Point Lighting
One of the most foundational lighting setups in 3D photography is the three-point lighting technique. This setup involves three light sources: the key light, the fill light, and the backlight.
The key light is the primary source of illumination, placed at an angle to create shadows and highlights. The fill light is positioned opposite the key light to reduce the harshness of shadows without eliminating them entirely. Finally, the backlight (or rim light) is placed behind the subject to separate it from the background, adding depth and a three-dimensional feel.
2. High Key and Low Key Lighting
High key lighting is a technique that uses bright light and minimal shadows to create a cheerful, airy atmosphere. It’s often used in fashion and beauty photography to highlight the subject’s features. This technique requires careful control of the exposure to prevent overexposure.
In contrast, low key lighting emphasizes darkness and shadow, creating a moody, dramatic effect. This technique is characterized by high contrast and a limited light source, which can evoke mystery or tension. Low key lighting is particularly effective in black-and-white photography and fine art portraits.
3. Rim Lighting
Rim lighting, also known as backlighting, involves placing a light source behind the subject to create a glowing outline. This technique is excellent for emphasizing the silhouette and contours of the subject, providing a sense of depth and separation from the background. Rim lighting is often used in portrait, product, and wildlife photography to create a striking visual impact.
4. Natural Light Manipulation
Mastering natural light is an essential skill for any photographer. Understanding how to use sunlight effectively can result in stunning 3D images without the need for artificial lighting. Techniques such as shooting during the golden hour—the period shortly after sunrise or before sunset—can add warmth and depth to your photos.
Additionally, using reflectors and diffusers can help control the quality of natural light, softening harsh shadows and directing light where it’s needed. Reflectors bounce light onto the subject, while diffusers scatter light, creating a softer effect.
Advanced Techniques for 3D Lighting
5. HDR Lighting
High Dynamic Range (HDR) photography involves capturing multiple exposures of the same scene and combining them to create an image with a greater range of shadows and highlights. This technique is particularly useful in 3D photography to ensure that all details are visible, from the darkest shadows to the brightest highlights. HDR can be achieved using software to merge multiple images or with in-camera HDR settings.
6. Light Painting
Light painting is an experimental technique where light is used as a brush to “paint” a scene during a long exposure. This method allows photographers to create unique patterns and effects that enhance the three-dimensionality of the image. By moving a light source, such as a flashlight or LED wand, around the subject, you can highlight specific areas and create dynamic lighting effects.
7. 360-Degree Lighting
For capturing immersive 3D images, 360-degree lighting setups can be employed. This technique involves evenly lighting the subject from all angles, often using an array of lights or a specialized rig. The result is a uniformly lit subject, suitable for use in virtual reality or 3D modeling applications. 360-degree lighting ensures that every detail is visible, providing a comprehensive view of the subject.
Practical Tips for Mastering 3D Lighting
Experiment and Adapt
Lighting in 3D photography is not a one-size-fits-all approach. Each scene and subject is unique, requiring experimentation and adaptation. Try different lighting setups, angles, and intensities to see what works best for your vision.
Use Lighting to Tell a Story
Consider the mood and message you want to convey through your photos. Use lighting as a storytelling tool to highlight emotions, create tension, or evoke a sense of wonder. Whether it’s the softness of a sunrise or the harshness of a storm, lighting can enhance the narrative of your image.
Invest in Quality Equipment
While creativity and skill are paramount, having quality lighting equipment can significantly impact your results. Invest in reliable lights, reflectors, diffusers, and modifiers to expand your creative possibilities and achieve professional-quality images.
Conclusion
Mastering 3D lighting is an art form that requires an understanding of both technical and creative aspects. By exploring different techniques and experimenting with various setups, you can enhance the depth, dimension, and impact of your photos. Whether you’re capturing portraits, landscapes, or abstract forms, effective lighting will bring your 3D photography to life, resulting in stunning images that captivate and inspire.


Post Comment